Monday, February 27, 2017

High Tide Highlight


Hello there!  I'm so glad I get to post this morning a card that isn't for a blog hop or challenge - just me sharing a card I made this weekend!  It was nice to get some time to just stamp for fun. :)

This card was fairly quick to make.  The watercolor background was very simple and it was my first time trying it this way.  I saw a video on a demo-only site or I would link it here for you to see.  The lady was from outside of the US and I'm not sure the video was in English either, but it was easy to watch.  I've looked for her video too to no avail - so - THANK YOU for sharing this - whoever you are <3

Okay, so all you need is a ziplock bag, some markers, watercolor paper and an aqua painter.
Take the ziplock bag and lay it flat on your work area.  Using your Stampin' Write Markers, color and area on the bag large enough to cover a card layer (a little shy of 4' x 5.25").  Set that aside.  Now using your Aqua Painter, get your Watercolor Paper fairly wet - I did squeeze the AP as I "colored" the paper.  Once that's wet, flip it over and press it onto the ziplock bag.  Carefully pull it off and dry the paper with your Heat Tool.  I added a little more of the Pool Party and Mint Macaron ink on the bag and repeated the process.  I hope that makes sense.  (I really want to start taking videos soon so you can see me walk you through these kinds of techniques!)


I used Memento Black Ink for the lighthouse, birds and sentiment.  The sentiment is on circles made with the Stitched Shapes Framelits Dies and the Layering Circles Framelits Dies.

A little Linen Thread and the card is complete.


If you have any questions about the technique, please don't hesitate to ask.

Have a wonderful Monday!
-Holly


Friday, February 24, 2017

A Succulent Pop & Twist Birthday for TGIFC96

Happy Friday everyone!  It's a beautiful, sunny (and COLD) day here in Minnesota.  I hope you're ready to play along with a new challenge at TGIF Challenges.  We had over 20 entries last week and they were all great to see!  This week we are honoring the lovely Bibi Cameron - she has recently left her job as a SU! demonstrator, but she is still worthy of admiration - she truly is gifted!

Bibi is one of the BEST at watercoloring flowers - or making floral cards in general.  Make sure to check out her website for inspiration!

Yesterday we celebrated my beautiful mother-in-law Linda.  She turned 60 so I knew I wanted to make a very special card.  I decided to (finally) try a Pop & Twist card.  I've seen so maybe over the past year but have yet to try one.  Linda likes fun folds and techniques so I needed to make it for her.

 
I focused mainly on the Oh So Succulent Photopolymer Bundle except for the front of the card's sentiment which is from the Milestone Moments.  The "sixtieth" fits perfectly in the banner framelit from the Large Number Framelits Dies.


The Succulent Garden DSP and Succulent Garden 3/8" Ribbon Combo Pack finish off the front.


If you are not familiar with the Pop & Twist card, here is the video I watched.  It was a lot less complicated than it looks!


I altered the sentiment a little since the front of the card had "happy birthday" on the front too.


Thank you so much for stopping by!  Please take a moment to play along this week at TGIF Challenges!

Blessings,
Holly

Thursday, February 16, 2017

Lift Me Up - Stampin' Up! Artisan Blog Hop

Hello!  Welcome to another blog hop with the Stampin' Up! Artisan Design Team.  If you came from Dani's blog, thank you for continuing on to me.  I'm Holly and I live in the US :)
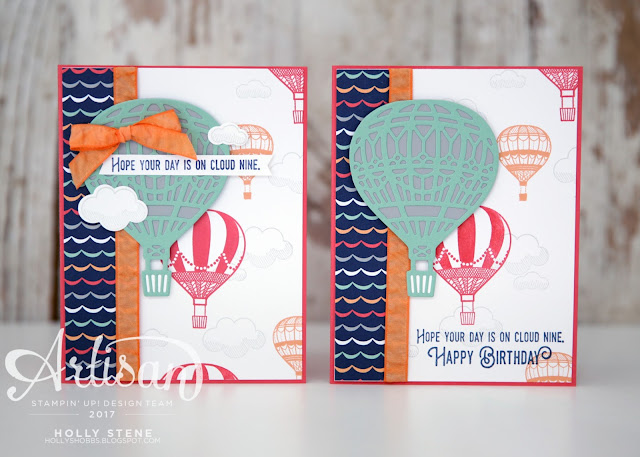
I hope that you are inspired by our Lift Me Up blog hop.  We are featuring the Lift Me Up stamp set and the coordinating Up & Away Thinlits Dies.

The first card I want to show you today is a "stepped up" version of the original one I made.  I love these little clouds and I'm all about ribbon, so why not add a bunch? :)


You can see the original below on the right.  I liked the look of the card but, again, I wanted to incorporate the diecut clouds and add a little more detail.


I split the sentiment up between the front and the inside and I really like how it turned out.


What do you think?


For the second card that I made, I had a little fun with the small balloon thinlit mixed in with the Large Letter Framelit Dies.  I cut up the sentiment for the balloon and added some Night of Navy enamel dots from the Regals Enamel Shapes collection.


I diecut some more clouds and added them behind and over the letters to give the clouds some more dimension.   Did you notice the cute designer paper in the background?  That is the Carried Away DSP pack that coordinates perfectly with this stamp set.  You can earn it free during the Sale-a-Bration promotion going on right now!


I added some Watermelon Wonder 5/8" Mini Striped Ribbon, some Night of Navy Solid Baker's Twine and a white paper clip from the Mini Paper Clips Combo Pack.


I hope you enjoyed my creations!  I would love to hear from you before you continue on!  I'm certain Jennifer has something amazing on her blog too, so make sure to make your way around the hop!  You won't be disappointed. :)


Have a wonderful day!

-Holly

Sunday, February 12, 2017

A Dino-riffic Birthday Party!

Saturday afternoon we celebrated our oldest son's 6th birthday along with his friend from school.  They were t-ball teammates last summer, they're in the same classroom and his mom attends my stamp class.  I was already planning a dinosaur party for Eli, so I suggested the idea that the boys share the party.  We decided to let the boys share the day and they had a blast!

Two weeks ago I sent the invites to the teacher to pass out to the kids.  The made the invite on my computer and customized the font colors to match Cucumber Crush, Tangerine Tango & Bermuda Bay.

I then took the No Bones About It stamp set and stamped the dinosaur skeletons on the background in Smoky Slate.  I also stamped the party hats with the coordinating colors.


I decided on Thursday to paint a mural for the background.  I'm not quite sure what I was thinking, but I managed to make one in time and Eli cannot wait to hang it in his bedroom!


The banner I made with Smoky Slate cardstock.  I stamped the background again with the dinosaur skeletons.  I added 2 circle layers - the Bermuda Bay scallop circle from the Layering Circles Framelits and a white stitched circle from the Stitched Shapes Framelits.  The letters were cut using the Large Letters Framelits.


For the cake toppers, I kept things simple.  These only took a few minutes to cut and tape to the stick.  Again, I used the Large Letter Framelits for this.


For the little thank you gifts for the boys and girls I knew exactly which stamp set to use.  I received the All Things Thanks stamp set last November at OnStage and I thought it was so neat to have a thank you sentiment to go along with a birthday.  This stamp (in the top left corner) was perfect for the gifts and we will use it again to send thank you cards.  It says "Thank you for making my birthday happy".

The boys each received a cute little box with dinosaurs and candy.  I used the Clear Tiny Treat Boxes which were the perfect size!


For the tops I cut some Bermuda Bay cardstock with the 1 3/4" circle punch, added a Cucumber Crush leaf made with the Botanical Builders Framelits and finished it off with the sentiment and some Bermuda Bay Baker's Twine.  These were so fun to make and I was very pleased with how they turned out! 


For the girls that came, I made the same tag but they received nail polish, chapstick and candy instead of dinosaurs! These fit perfectly in the Gusseted Cellophane Bags.


For the food labels, I stamped the dinosaur skeleton on the background and used my Bermuda Bay and Tangerine Tango Stampin' Write Markers for the writing.


I have always enjoyed throwing parties and love it even more so when I can use Stampin' Up! products that I have on hand to decorate with.  I know the colors will coordinate and that everything will look great!

Thanks for taking the time to look at today's post.  I hope this gave you a glimpse of how great SU! is for things other than cards.

Have a wonderful week!

-Holly

Friday, February 10, 2017

Make a Wish - TGIFC94

Happy Friday!  Welcome back to another TGIF Challenge!  This week we have a sketch challenge which seem to be everyone's favorite to play along with, so hopefully this is one that inspires you to play along!

I actually had this card made 2 weeks ago because I did the wrong challenge!  I made this card for my sweet nephew Luke who just turned 18 last Friday.  He's the boy "man" who made me an aunt for the first time. :)


I decided to flip the sketch on its side.


I love this Urban Underground DSP - it's a great pack of designer paper for masculine cards.  Both pieces are from this pack.  

The "make a wish" sentiment is from the Window Shopping stamp set.


I hope that you join us this week at TGIF Challenges!  We love to see your creations :)

Have a wonderful weekend!

-Holly


Thursday, February 9, 2017

Cupcakes & Carousels in Peekaboo Peach

Hello friends.

It's been awhile hasn't it?  Seems to be the story of my life lately!
But I'm happy to report I have been stamping a lot lately and have some fun stuff to share with you over the next week!

Our oldest has a birthday tomorrow so I have been busy prepping for his party.  I did have a few moments to do something other than party planning though and I wanted to share with you one of the cards I made yesterday with this Cupcake & Carousels stamp set.

I made 5 cards and it took me awhile to make one I really liked.  This was the one I loved the most!


Hope you like it too!

Check back tomorrow for a new TGIF Challenges challenge!

Blessings,
Holly

Sunday, February 5, 2017

It's a Birthday Bonanza - The Creation Station Blog Hop


Welcome to another Creation Station blog hop!  We hop on the first Sunday of each month and I'm excited you've joined us this week!  If you came from Sara's blog - thanks for continuing on to me.

I'm very excited to show you a few cards I made with the new Big On Birthdays set from the Occasions Catalog.  This was a set that I debated about - but this one particular stamp I couldn't resist any longer.  I needed a birthday card from my husband's grandma who just turned 86 and these flowers and sentiment seemed perfect!

Here is the collection of cards I made:

The color combo I chose for these cards consists of:
Rose Red
Basic Black
Pool Party
Marina Mist (on one card)
Pear Pizzazz
Old Olive
Always Artichoke

I first stamped two vertical cards and really liked the look but felt there was something missing in the top right corner so I decided to make a horizontal card with the same idea. 
Two layouts - two different twines... Which do you like better?  


The next card was my take on the card in the catalog.  I didn't have the specialty paper in the sample so I decided to use some Pear Pizzazz DSP from the Subtles Designer Series Paper Stack.  I think the stripes look great!


For my husband's grandma's card, I wanted to make it simple but still add some extra sparkle.  I added some Silver 5/8" Satin Ribbon and some Rhinestone Basic Jewels.  This was also the first card I made and colored the flowers with Marina Mist - I think the Pool Party looked better with the combo.


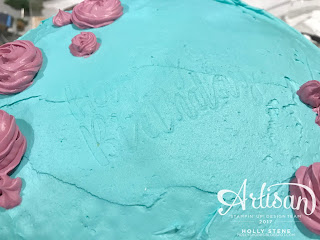
So then I decided to make her cake match - because that's how I roll.  :)


I took the (clean) stamp and stamped right into the icing to try to make the font look the same.  It worked really well - now I just need to work on lettering with icing!

She really loved her cake which made it all worth it!


Thanks so much for stopping by today!  Make sure to make your way around the hop - I know you won't be disappointed and you will have lots of inspiration for birthday cards!  You can go back to sweet Sara Levin or onto the lovely Jennifer Downey.

And as always, you can find a list of the supplies below.

Blessings,
Holly


Product List