Saturday, July 29, 2017

A Rich Razzleberry Cup of Joe!

Hello friends :)

Just a quick card today.  I'm trying to stamp as much as I can at the moment.  If you read my post yesterday (and I hope you did) I mentioned I had an ultrasound appointment.

Well, at 35 weeks, baby's head is down and estimated 7 pounds.  Her brothers were all big babies too (two were over 9lbs), so I'm thinking she will be early.

So, I will stamp while I can!

Here's a card I made with the Coffee Cafe and Coffee Cup Framelits Dies.  I was not going to purchase this set because I'm not too fond of the brown and green scheme, but I kept seeing fun colorful cards without the DSP, and I finally gave in!


I added some crumb cake ice cubes on the coffee cup that I used my Sponge Brayer on.  The lid is made with Vellum Cardstock - so cute!


This was also the first time I used this Rich Razzleberry 1/4" Stitched-Edge Ribbon and I absolutely love it!  It is very easy to tie - it's almost like a shoelace consistency.


I used the same sheet of Powder Pink polka-dot paper from the Whole Lot of Lovely DSP pack.  I love to add the details from the front to the inside of my cards.  I need to remember to do this every time!


I hope that you have a wonderful rest of the weekend!  Remember, only a few days left for Bonus Days!


The Coffee Cafe Bundle gets you very close to a free $5 coupon for next month!
Shop my store and use hostess code VCEN44XB at checkout.

Have a great weekend!

-Holly
Product List

Friday, July 28, 2017

Welcome Little One - TGIFC118

Happy Friday!! I hope you're ready for the weekend! Today I have an ultrasound to see baby #4, so I'm anxious to see how much she's grown!  I'm officially 35 weeks and feel like it could be soon!  But other than that, nothing big planned for the weekend.  

If you have a moment this weekend, why not join the fun at TGIF Challenges?  We have a "Emboss Resist" technique for the challenge.


Here is my creation for this week - inspired a little by the color theme I'm thinking about for our daughter's nursery.  (Will be Coral, Mint and Navy)


I wanted to keep things fairly simple here.  I embossed the "welcome little one" stamp in Clear Stampin' Emboss Powder and sponged some Calypso Coral Ink over top.


I added some Night of Navy Washi Tape from the Basics 3 Washi Tape Pack.  I love these packs of the washi that Stampin' Up! has now - it's so nice to get a color group to use!

I also added some of the Calypso Coral Ombre Ribbon for an extra (tiny) detail.


Finished the inside with a little more washi and some stars.


I hope you take a moment to join the fun over at TGIF Challenges!

Have a wonderful weekend!
-Holly


Thursday, July 27, 2017

Weather Together 3 Ways - Simple to Stepped Up!

Do you prefer simple or stepped up cards?  I find I don't make many simple cards - I like lots of layers and embellishments!  At 35 weeks pregnant with 3 other little ones - one would think that I would choose the simple route - but I just love all of the embellishment options that SU! offers.  But sometimes time or budget is a factor, so I have an easy simple card to show you too. 

Today I have 3 different cloud backgrounds - from simple to stepped up - to give you some options the next time you stamp.  Today I'm focusing on one my favorite stamp sets from the Annual Catalog - Weather Together (141543).  The images, font and die cuts make this a great bundle to own.


For the simple card, it really just involves stamping.  There's no need for a Big Shot - a quick and easy card.  For the background I stamped the larger cloud stamp with the white Craft Stampin' Ink & Refill.  On a 4" x 2.75" piece of Whisper White Cardstock, I stamped the umbrella in Lemon Lime Twist and Smoky Slate ink pads and colored the handle with the Peekaboo Peach Stampin' Write Marker.  A little bit of Whisper White Solid Baker's Twine and Pool Party washi from the Basic Pack 3 Washi Tape finishes off the card.


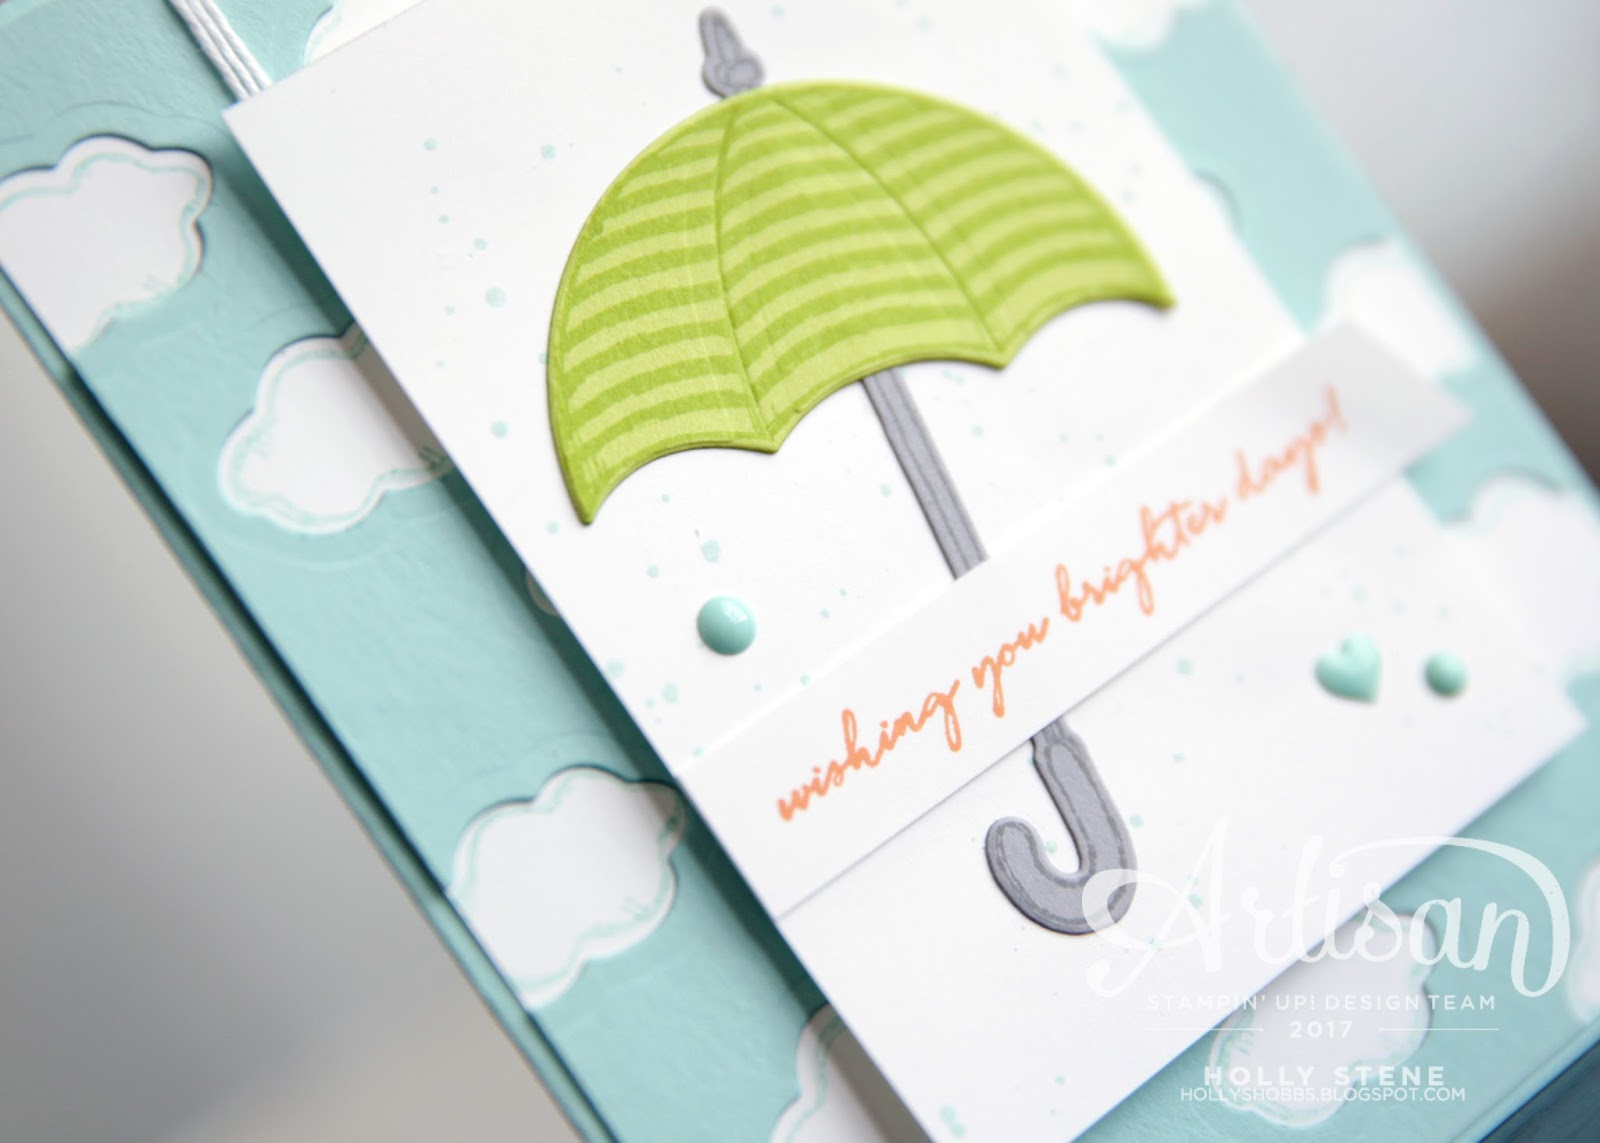
For the next card I wanted to step it a little and use the coordinating Umbrella Weather Framelits.  I took a layer of Pool Party Cardstock and used the 2 cloud framelits to cut out the background.  I then used Pool Party ink and stamped the clouds onto the white cardstock.  You can either adhere the layers first or hold them together with a little bit of washi tape.


I really like the detail the diecut clouds give to this background.  I also stamped and cut out the umbrella for this card, added a little Pool Party splatter with my Aqua Painter and added a few of the Pool Party embellishments from the Subtles Enamel Shapes pack.


For the final card of the three, I wanted to show the new (and amazing) Embossing Paste with the cloud decorate mask from the Pattern Party Decorative Masks pack.


This card is my favorite of the three - so many fun details on one card!  Definitely "stepped up".  (May I say though, the paste was way quicker and much easier than the diecut clouds!)

After the paste dried, I added the pretty peach bow with Peekaboo Peach 5/8" Crinkled Seam Binding Ribbon.  I really love how this ribbon looks on a card!  The umbrella is stamped and diecut again and adhered to a piece of Shimmer White Cardstock.  You can see that I added a watercolor wash and splatter to the background as well using an Aqua Painter.


I hope that you enjoyed these three similar yet different cards.  I'd love to hear which background technique is your favorite!  

I'd love to help you with your next Stampin' Up! purchase too!  You can purchase the stamp set and matching framelits for $46 (USD) before tax and shipping.  If you purchase $50 before the end of the month, you will earn a $5 coupon to use next month!  Shop here and use hostess code VCEN44XB

Wishing you brighter days!
-Holly

Wednesday, July 26, 2017

Two for Tuesday ... or Wednesday! Tone on Tone Embossing Paste

Isn't it crazy how easily distracted one can get?  Yesterday morning I made these 2 cards to post for my "Two for Tuesday" posts that I'd love to start doing.. and well the second week in and I'm already off!

So it's Wednesday and you're getting a Two for Tuesday post!

Last Tuesday I showed you two cards made with the same background and two different stamp sets.  Today, We have two cards that coordinate a little more.  I wanted to use some more of this Embossing Paste too - I just can't stop using it! I love it!


I really like the tone on tone look but needed a little help getting the Powder Pink shade of paste.  Jennifer Sootkoos posted on Instagram a few weeks ago that if you are looking to add color to the paste, use your re-inkers.  This works really well... if you have the re-inker you need.  

Which I didn't.

However, she gave a great tip.  Simple dab your Silicone Mat into your ink pad a few times until you have ink to mix with your paste.  Voila!


I cut out the center of the Whisper White layer and added it to the Powder Pink card.  I then added the sentiment from Lots of Love and embossed it with Gold Stampin' Emboss Powder on Vellum Cardstock and punched it out with the 1 3/4" Circle Punch.


For the second card, I took the same ribbons and filled in the negative cutout.  I used the 3/8" Shimmer Ribbon in Powder Pink and some of the new Gold Mini Sequin Trim.


I really like how it turned out.  
I also stamped and embossed the same image - this time on Whisper White CS.


So what do you think?  Have you tried the embossing paste yet?  Try adding some color to it next time!

Have a great Wednesday!  I'll be back Friday with a new card for TGIF Challenges.

Blessings,
Holly


Product List